Slideshow

Life Love Lens Wednesdays: The Magic of Editing in Lightroom and Photoshop - Before and Afters {Richmond Photographer}

Wednesday, February 27, 2013


Well, today I was supposed to be at an awesome Seminar by Kelby Training called Photoshop CS6 for Photographers. But alas, the stars were aligned against me....and here I am blogging. I was super excited to learn some new tricks and hopefully get to network with some other local photogs. I had to scramble to find childcare for the afternoon but I was all set and had all 3 kids covered.....and then my 5 year old came to visit in the middle of the night...with a fever. Ugh! So, my hubby was able to stay home for the morning so I could go to the first hour of the seminar, which was awesome. I only wish I could have stayed for the rest....oh well. You win some, you lose some, right?

So, in the spirit of all things editing, this {Life Love Lens} Wednesday post will be on the magic of Photoshop (and Lightroom!) Below you will see some before and afters, as well as some of the "recipes" I used to achieve that particular look. But before I start, I want to stress the importance of getting your image right IN camera, and not relying on editing tools to "fix" anything - PS and LR are strictly for enhancing images and giving them that extra POW! ;)

Another disclaimer: This is the way the I edit, not necessarily the ONLY way to do it or even the right or wrong way...just MY way. So, take it for what it's worth...hopefully you will learn something, or at least find it interesting to see the way that others edit. I always find it fascinating to see how other people workflow and edit.

So, here's my workflow: 
I shoot in RAW, so the SOOC (straight out of camera) images look pretty dull and flat usually, but I have a TON of info to work with. Shooting RAW vs. JPEG is another topic for another day....
I then import into Lightroom and do basic edits including adjusting white balance, exposure, contrast, highlights and shadows, if necessary. I also love the tone curve adjustment in Lightroom which lifts up the mid-tones. 
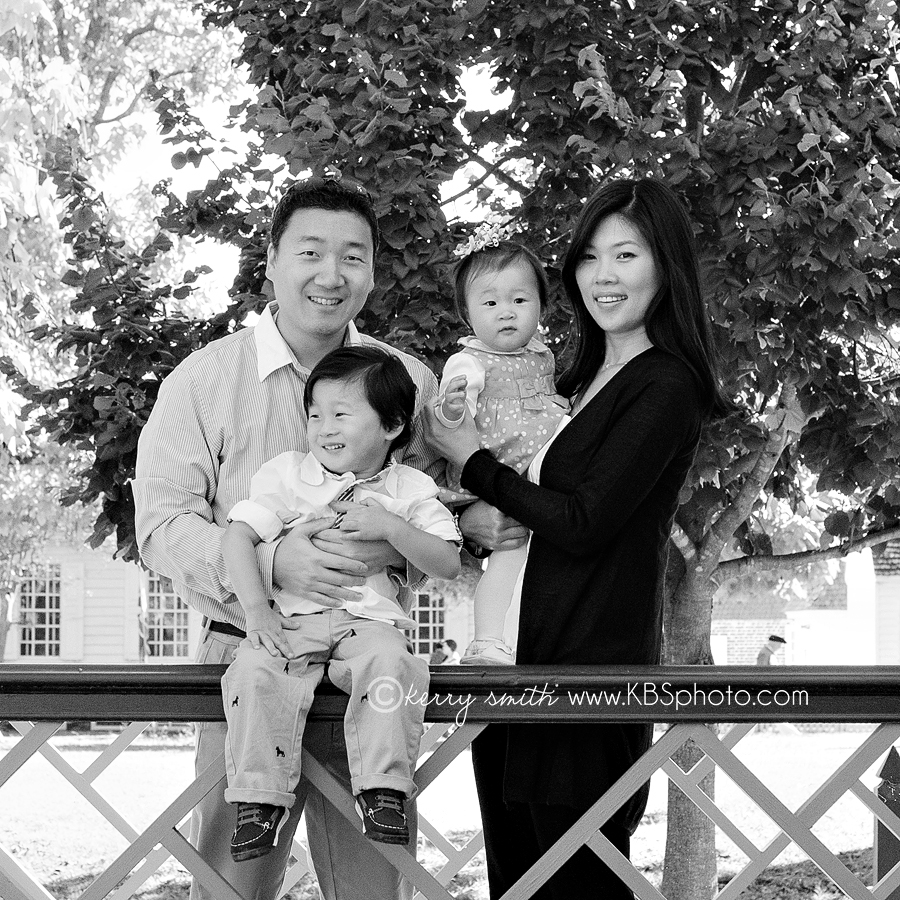
I then save as jpegs and import into Photoshop CS6. Photoshop is where I polish my images and give them that artistic feel and WOW factor. I have some action sets that I love, but I will often create my own action set for a particular session to keep it all cohesive. (Truth be told....I have a few of my own little creations that I use 90% of the time that are MY style and create a look that is similar across the board on my images.) I tend to prefer a clean, light, bright image with a touch of vintage feel. Well, that is how I would describe it...do you agree? 

If you have photoshop and are looking for some awesome actions check out: Michelle Kane, Paint the Moon, MCP, and Pure Photography Actions. They all have some freebies you can download to try them out before you commit to buying them. If you want my opinion or advice, I'm happy to help, just email me! Before you jump on the action train though, be sure to study and practice, practice, practice. There is no better way to find your own style than to just use trial and error. 

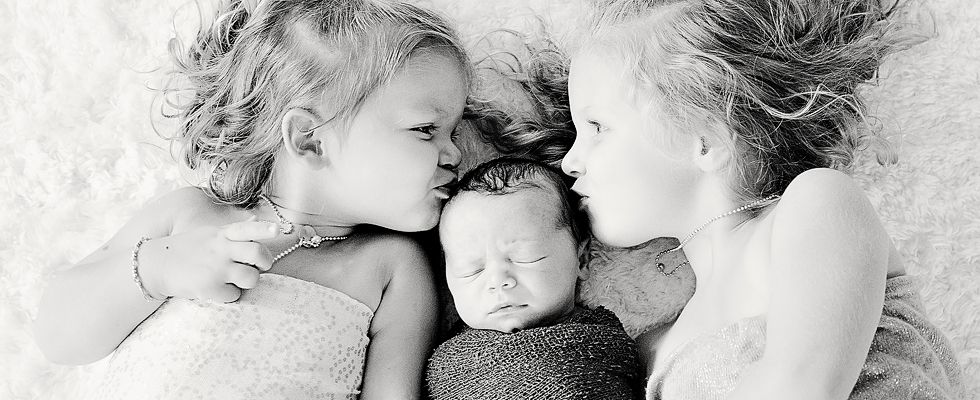
The image below is sweet little Elizabeth. The SOOC is a little underexposed and blah, so in LR, I actually lowered the exposure a tad, but boosted the mid tones and lightened the shadows. Then in PS, I warmed it up a tiny bit and added some tones (pink-ish and lavender) to make it sweet and pretty.


The shot below is one of my favorites from Meghan's maternity session (full session will be on the blog at the end of the week!) So, the day we shot was COLD and overcast, so the light was nice and diffused, but also a little dull and "blue." In LR, I warmed up the white balance and boosted the mid tones, then I added some pretty tones and contrast in PS. Isn't she so pretty?

Last one, this is my sassy daughter (again) from halloween (again.) I underexposed this one a bit (oops) so I adjusted that in LR, then in PS I warmed it up, increased the contrast a bit more and softened her under-eye shadows. The result is clean and POPpy and pretty, just like her! ;)

I hope you enjoyed this weeks LLLW. Leave me a comment and let me know if you have any questions!

Now, to attend to the patient.....

xoxo,
Kerry

Life Love Lens Wednesday: Tips for Capturing REAL Expressions from Kids {Richmond Child Photographer, Photography Tips and Tricks}

Wednesday, February 20, 2013


All of us moms, I’m sure, can relate to this truth: 
When the camera comes out, your kid suddenly doesn’t look like him/herself. 
They get super shy or scared or pose-y. 
I get this question a lot from friends and clients: 
How do you get them to have a REAL smile/expression/face?

Well, the truth is, every kid is different. Something that works well for one child, might not work for another. I do, however, have a few ‘tried and true’ tricks that I use to elicit a natural response from my littlest clients.

But first there are a few rules you should be aware of:
First, respect their feelings. If they are feeling shy, having someone tell them to “smile” will NEVER give you the response you want. Sometimes you have to give them some time to warm up, and sometimes you have to just put the camera down and try again later.
Second, “SAY CHEESE” is NOT allowed during any picture taking moment.....EVER! 

So, now that you know the rules, here are some of my favorite tricks:

Trick #1: Tell them NOT to smile. This works GREAT with most pre-schoolers. I tell them we are doing a “serious” picture, and whatever they do, they CAN’T smile. Sometimes I have very good ‘rule followers’ and I have to egg them on by saying something like “whatever you do, don’t smile.....don’t do it....oh no...I see a little smile....oh NO!!! You smiled!!” (you get the picture, right?) Honestly, there is rarely a kid that this doesn’t work on. It makes you seem a little nuts, but it’s totally worth it! ;) The shots below show this technique in use. The left is him trying very hard not to smile, the right.....success (for me anyway!)

Trick #2: Play peek-a-boo. This can work with any age, with a few modifications. Babies love a regular ol’ game of peek-a-boo from behind your camera. I will typically set up the shot with my focal point in place and my finger on the button and then peek to the side and say BOO! It doesn’t have to be a loud or wild ‘boo’, sometimes just a little whisper works better. And sometimes I don’t even say anything, just peek around and smile or make a silly face. The trick with this one (and actually with all of them) is timing. Be ready to click even when you are not looking through your viewfinder. I try to pop right back into position, but most of the time “the” shot happens just as I move my head over to “boo” them. ;) Anticipate their reaction, and click away.

Trick #3: Have a cheering section. Everyone loves too see people cheering for them, right? Well, babies and kids are no different! I have to say, this works best with babies up to about 2-3 years. After that, some of them get embarrassed by this kind of hoopla (especially out in public.) I do this all the time with my cake smash session babies. I’ll have mom and dad and whoever else is there stand behind me and all of a sudden start cheering and clapping and woohoo-ing. The babes LOVE it and usually will start clapping and cheering themselves. Nothing is better than a messy, happy baby. ;)


Well, I hope those little tips will help you when you are snapping away at your kiddos. Make sure you anticipate the reaction, and know your camera well enough to know how long you have between pressing the button and snapping the picture. 

Now, my last little bit of advice that goes back to the “respect their feeling” rule: A great shot does NOT have to show your kid looking at you and smiling. “Eyes and smiles” shots are great, but some of my FAVORITES of my own kids and my clients kids are ones where they are ‘involved’ in doing something they LOVE to do. Whether it’s smelling the flowers, or looking for an airplane, laughing or twirling around. Catch the REAL moments, not just the PERFECT ones.

Some of my favorites.....


Thanks for checking out this weeks {Life Love Lens} Wednesday. If you missed the previous posts be sure to check them out HERE and HERE. And let me know what you would like to read about next.

xoxo,
Kerry

1,2,3,4 Sunset! {Richmond Family Photographer, Midlothian Maternity Photographer}

Sunday, February 17, 2013

Hi!
This is the Johns Family. 
When mom called me to do a maternity/family shoot with emphasis on the whole family I was super excited! When she reminded me that their oldest was 4 and the twins were 2 and she wanted to do it near the water at sunset I started to sweat a little! ;)
I'm so glad I was "forced" out of my comfort zone a little, because I think the results are so beautiful!! What do you think??


 I'm still catching up on 2012 sessions, so check back for more soon. :) And remember to keep an eye out on Wednesdays for {Life Love Lens} Wednesdays. You can see the first post (my Top 3 Tips for moms with a camera) HERE and the second one (DSLR/Photography Basics of Exposure) HERE.

Thanks for stopping by!
xoxo,
Kerry


DSLR/Photogrpahy Basics - EXPOSURE {Richmond Photographer, Photography Basics}

Wednesday, February 13, 2013


Photography is so cool because it uses both sides of your brain. 
It is art and science. 
It is technical and creative. 
You need to “see” the shot AND be able to “capture” it. 

There are several components of a great photo, from focus to composition to subject...but the MOST important is proper exposure. Your cameras auto setting may do a decent job in most situations, but in order to ensure you can get correct exposure on every image you need to learn to shoot in manual (or semi-manual) mode. Don’t worry, you can do it!! ;) Just keep reading....

First, you need to know what factors are involved in exposing an image on your DSLR. They are 
ISO
Aperture (f-stop)
and Shutter Speed.
Now, don’t get overwhelmed by the new vocab words ;) ....it will take some practice, repetition, & time but once you “get it” you’ll be amazed at how simple it is!

I usually start with setting my ISO. ISO is the sensitivity of your camera’s sensor to light.  (FYI if you used to shoot with film, it is similar to the old “film speed” values) So, when you are in bright sunlight your ISO will be lower, when you are in a low light situation it will be higher. Below is a handy little chart I created to help you decide which ISO might be appropriate.

General advice: keep your ISO as low as possible; the higher the ISO, the more ‘grainy’ your image will be.

The next setting I usually adjust is my APERTURE (also called f-stop.) The aperture is the ring inside the camera that opens to let in light. The wider it is open, the more light is let in.  Aperture numbers can be confusing because a LOWER number means a WIDER aperture opening. So f-1.4 is wide and lets in MORE light and f-11 is narrow and lets in LESS light. 

This is where you can adjust for creativity because the aperture width determines your depth of field (DOF.) Do you ever look at a pro’s image and wonder how they get that creamy blurry background and the subject is so sharp and in focus? Well, here’s how: Use a WIDE aperture (LOW f stop number)! You subject will be sharp because they are in the “field” of focus, and everything else will just blend in because they are not within the field of focus. Does that make sense? Below are a few shots showing what different apertures do to your depth of field. The left one has a very shallow depth of field where the camera is nice and sharp while everything else fades away. As I closed my aperture the field got bigger and you can see more of the surrounding details.

I tend to shoot wide (LOW f- number) whenever possible. A good general rule is a ‘stop’ for each person in the photo. So, one person, you can shoot at f-1.4 (if your lens opens up that wide,) three people at f-3.2, five people at f-5.6. 

****If you are just starting out with a DSLR, I recommend shooting in aperture priority mode for a little while. This means YOU will set the ISO and the f- stop, but your camera will set the shutter speed.**** Once you get the hang of relating those two features (ISO and aperture) then you can add in the last component: SHUTTER SPEED.

SHUTTER SPEED is pretty easy to figure out, it’s the speed at which your shutter opens and closes to let in light. So, the slower the shutter speed, the more light enters your sensor, faster = less light. Your shutter speed also allows you to “freeze” an image or show movement. So, if you are taking shots of you sons soccer game, your shutter speed needs to be pretty fast so that all of your images don’t show streaks of kids as they run past. :) See the shots below at different shutter speeds. The left one is fast and freezes the droplets as they fall, the one on the right shows a blur as the water falls. (FYI the faucet was on continuously as these shots were taken, so the speed of the water is basically the same in each shot.)

Remember in the first {Life - Love - Lens} Wednesday post where I told you to start looking for light? Well, that’s because photography is ALL ABOUT LIGHT. Each of the three main variables work together to let in certain amounts of light. Too much light will give you an over exposed image (BAD!), too little light will give you an under exposed image (ALSO BAD!) So, you have to be in control of your camera so that you tell it how much light to let in. Don’t slap it into Auto mode and let it tell YOU how much light it wants!! ;)

So to wrap it up:
ISO: low # = less light, high # = more light
APERTURE: low f-stop = more light, high f-stop = less light
SHUTTER SPEED: slow SS = more light, fast SS = less light


I hope this helps explain your DSLR and exposure a little better for you. Please leave your questions and comments below, or on my facebook page HERE and I will be sure to answer them. :)

Thanks for stopping by! Have a wonderful {Life - Love - Lens} Wednesday!!

xoxo,
Kerry

Life - Love - Lens Wednesday: Top 3 Tips for Moms with a Camera {Richmond Photographer, Photography Tips}

Wednesday, February 6, 2013


First of all, I’d like to make sure there is a disclaimer here. I do not consider myself an expert on all things photography. I do, however, spend a lot of time and effort educating myself and learning everything I can on whatever I am most interested in at the moment. :) I feel confident in the things I DO know, and that is what this blog will be about.....what I know, and what I do. So, with that said, here are my top 3 tips for all of you ‘moms with a camera.’


1. Take your camera with you everywhere - even if it’s just your iPhone. Take it everywhere and make sure to take at least a few snap shots. You will never regret having a picture of your loved ones, but you might regret NOT having one when an opportunity/event/somethin’ special arises.

This was shot at my son's field trip to Children's Museum of Richmond. I LOVE his curls, AND his kindergarten handwriting!
2. Look for the light. It’s simple, but often overlooked. If you have a window, door, skylight or anything that let’s in natural light you want to see the light and use it properly.  TURN OFF YOUR FLASH and use whatever natural light you have. Face your subject towards the light, but not directly IN a ray of sunshine and you will tend to get the best results. This may require some experimentation, but at least start looking for the light. You will be amazed at the things you notice when you look at light instead of specific objects. 

The images below were taken in my home studio where I have some ah-mazing light (3 walls of sliding glass doors.) 

BUT You don’t have to have a room with tons of windows to get great light, one little window will do, as in the shot below. This was shot in a clients house with one window to the left of the baby.

So, just look around your house during different times of that day and make some mental notes, then practice, practice, practice!

3.  Look for emotion - timing is everything! I’ll be the first to admit that when I started my business I did NOT have the best technical skills, but what I did have was a desire (together with some skill and luck) to capture emotion and an ‘eye’ for composition. I would rather have a (less than perfect) shot of my kids laughing or looking like ‘themselves’, than a technically perfect portrait where they have a fake smile and some silly prop in their hand, wouldn’t you?
I will be writing another post on the best ways to ‘catch’ just the right moment, but I think it is important to know that you need to LOOK for it, and most importantly anticipate it.


So, those are my top 3 tips. Yes, they are VERY basic, but I hope they will make you look at things a little (just a little) differently.

If you have any questions, I would love to hear them and add them to my next {Life-Love-Lens} Wednesday post. Please leave a comment below and let me know what you think! ;)


xoxo,
Kerry

She's one!! {Virginia Family Photographer, Cake Smash Photographer}

Friday, February 1, 2013

I'm on a blogging roll!! ;)

This is the beautiful Han family. We met in Colonial Williamsburg for a family/first birthday session. Miss S was a little tired by the time we got to the cake smash portion of the session, but she did enjoy it!!


Thanks for stopping by!

Be sure to check back next Wednesday for {Life * Love * Lens} Wednesdays. Next weeks topic: Basic camera tips and tricks!

xoxo,
Kerry

Blog Design by Nudge Media Design | Powered by Blogger